Wi-Fi and network
How to connect to eduroam, the Goldsmiths campus network.
Primary page content
Wi-Fi usernames are in this format:
abcde001@campus.goldsmiths.ac.uk
Wi-Fi for Visitors
Guest Wi-Fi access is available for visitors to Goldsmiths
Mobile
- Tap Settings > Wi-Fi
- Choose eduroam from the list of available networks
- Enter the following settings:
- Under EAP Method select PEAP
- Under Phase 2 Authentication select MSCHAPV2
- Under Identity enter username@campus.goldsmiths.ac.uk
- Under "CA Certificate" "Use system certificates" then under online certificate status select "Don't validate"
- Under "Domain" type "gold.ac.uk".
- Under Anonymous Identity enter anonymous@gold.ac.uk (this is not compulsory, but some newer Android versions require it, so it’s good practice to enter it)
- Under Password enter your campus password
- Tap on Connect.
- Tap on Settings > Wi-Fi
- Select eduroam from the list of available networks
- In the username field enter your username@campus.goldsmiths.ac.uk
- In the password field enter your campus password
- Tap on Join
- Tap on Trust to accept the certificate
- Go to Settings (from your application list)
- Select Network & Wireless > Wi-Fi
- Select eduroam from the list of available networks
- Enter your username@campus.goldsmiths.ac.uk
- Accept the security certificate and you should be connected
Laptops and Desktops
Please note that consoles and IoT devices are currently not compatible with our network. We are working on introducing new services to support these devices, we will keep this page updated with further developments.
- Click on your Wi-Fi icon to bring up the list of Wi-Fi networks available and select eduroam
- You will be prompted to provide your username and password. Your username should be in the format username@campus.goldsmiths.ac.uk. Then insert your password (the same you use for your emails or VLE)
- You might get a security prompt like the following:
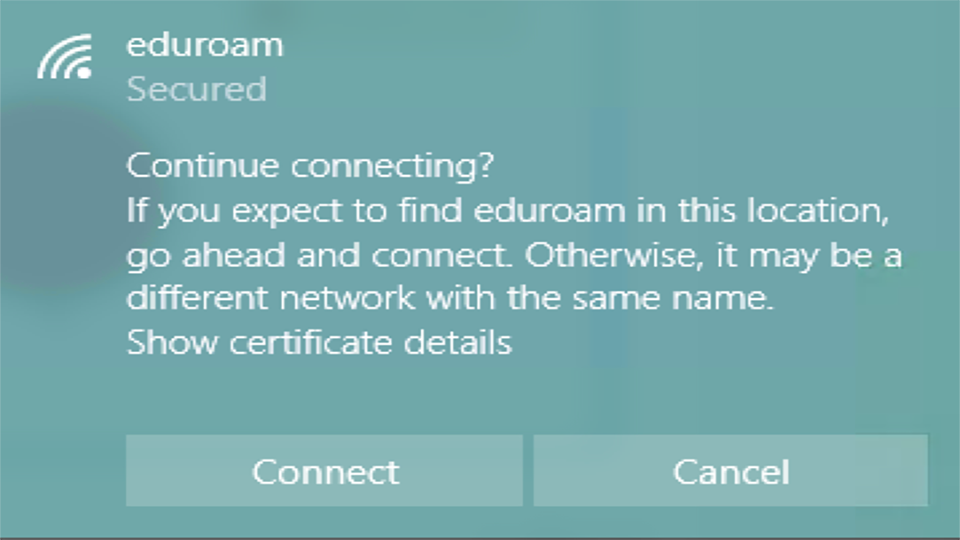
If you do, please click on Connect.
- Click on the Wi-Fi icon and select Eduroam from the drop-down list
- You will be prompted to provide your username and password. Your username should be in the format username@campus.goldsmiths.ac.uk. Then insert your password (the same you use for your emails or VLE)
- You might get a security prompt like the following:
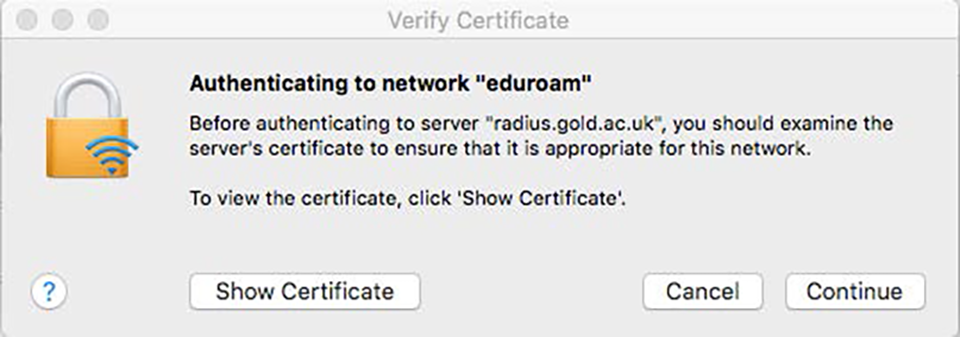
If you do, click on Continue.
- Click the Network icon in the System Tray and select eduroam
- In the dialogue box set Wireless Security to WPA & WPA2 Enterprise
- Set Authentication to Protected EAP (PEAP)
- Ensure Anonymous Identity is left blank
- Set CA Certificate to (None)
- Set PEAP Version to Automatic
- Set Inner Authentication to MSCHAPv2
- Provide your username in the format username@campus.goldsmiths.ac.uk and password, then click the Connect button.
- In the new dialogue box, click the Don't warn me again check box, then click Ignore
- Choose eduroam in the list of available wireless networks
- Select Configure at the bottom of the list, then
- Under EAP method dropdown menu select PEAP
- Under Phase 2 authentication select from the dropdown MSCHAPv2
- In the Identity field enter your username@campus.goldsmiths.ac.uk
- In the Password field enter your password
- Leave Anonymous identity empty
- Tick the Save identity and password option and click the Connect button
- Click Continue button when prompted.